Welcome!
Welcome to my blog! I will document over time my projects in my career in the software developing.
My first website
I thought on documenting my projects. I came to the decision on creating a blog on the world-wide-web.
My primary objective was to obtain a domain and develop a website while keeping expenses at a minimum.
After quite some researching, I came to the conclusion to launch the website on GitHub.com. In order to do that is a new repository required. The name must be as follows: 'name'.github.io.
I obtained my marlonbitiq.com domain from the website Squarespace.com. I initially looked for a Google domain, but that changed due to Google stopping domain selling.
I used Visual Studio Code to create my HTML and CSS scripts. It also enables me to submit my changes directly to GitHub. I used YouTube and the internet to find answers and learn new skills.
3D game in Unity with C#
I decided to turn my school into a 3D game using Unity to improve my creative and technical skills.
Despite facing difficulties, like losing the project and having to rebuild it, this experience showed my endurance.
I navigated the complexities of 3D modeling and Unity programming, gaining skills like importance of careful planning for future projects.
In the end, this experience was not only rewarding but also set the foundation for my ongoing exploration of programming and future projects.
You are able to find the download file in the Downloads tab.
Cisco Packet Tracer
Cisco Packet Tracer is a powerful tool to create network topologies and imitate modern computer networks.
This section is intended to provide a brief overview of this topic:
I first encountered this software in module at the vocational school, Module 129.
It was an extremely interesting experience, allowing me to create a variety of networks and explore the vast potential of the internet.
Establish connection to different networks
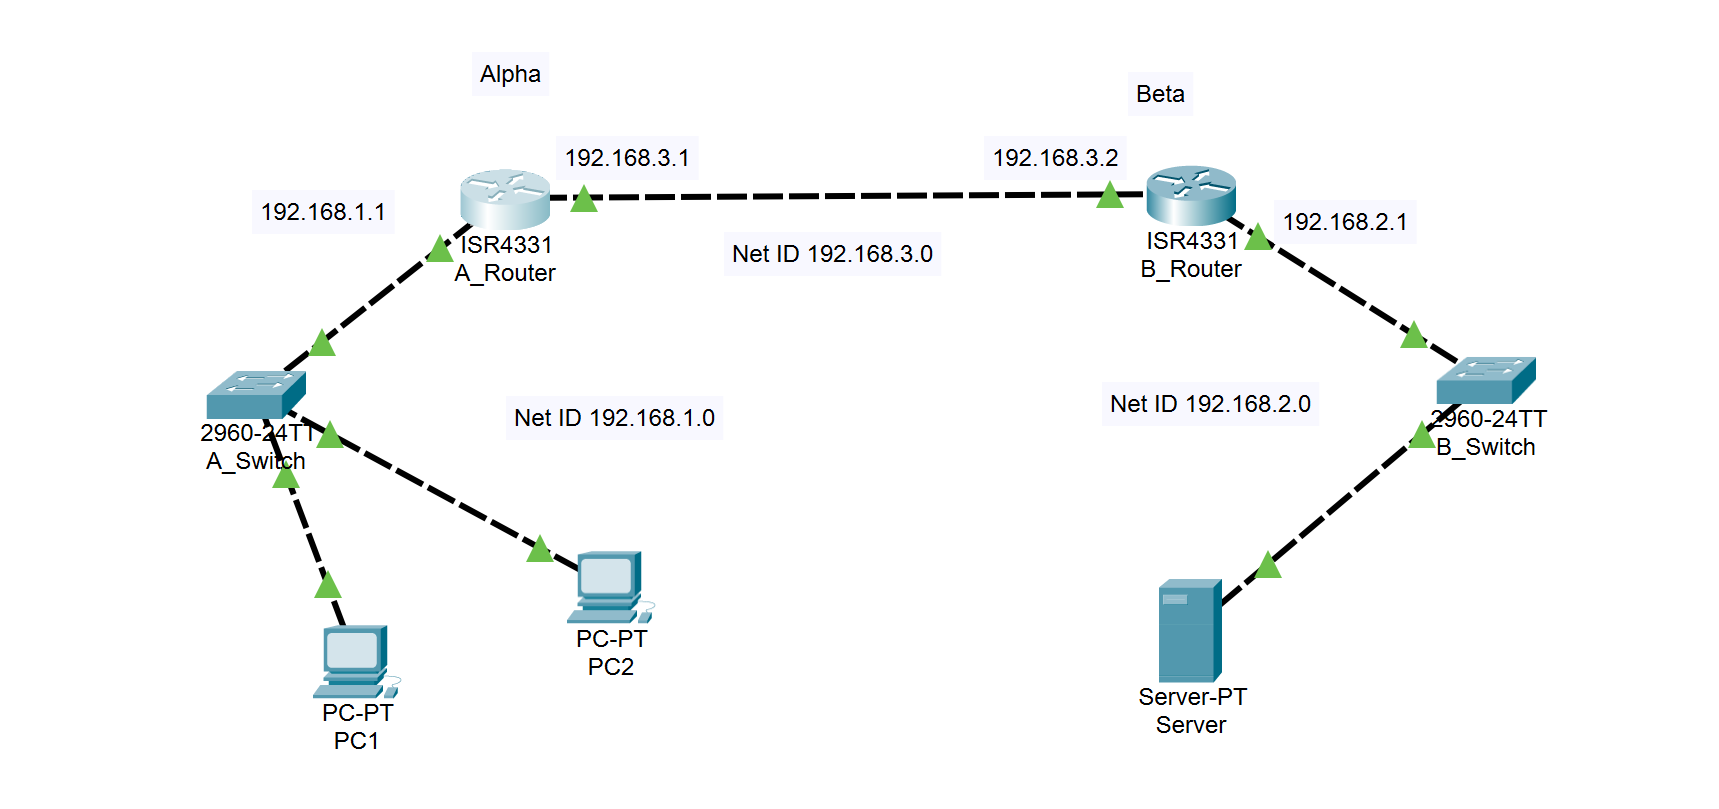
A simple network is illustrated here:

All IP addresses and subnets have been correctly assigned. However, we are unable to ping the server from one of the PCs. The reason for this is that the router A is not aware of the existence of the network 192.168.2.0.
What we need require now is a so-called IP route or IP hop. This enables the router to be informed of the network ID.
Once we have entered the router setting, we navigate to ROUTING -> Static. Here, we will need to enter the following IPs:

Network: This is where we define the network ID that the router should be aware of.
Mask: This is where we define the subnet mask of the network ID.
Next Hop: This is where we tell the router A where the router is, that is able to redirect us to the network. In this instance, the appropiate router would be router B with the gateway address 192.168.3.2.
Freelancing Barbershop websites
The Internet has come of age and everything is online. My hairdresser, who always does a perfect job, did not have a website to book a haircut.
We worked together to create a functional Website showing his location, prices and a booking function.